


Author Headshot Guide
Professional-looking headshots are a super important part of your website. Unfortunately, a shot of yourself cropped out of a photo from your sister’s wedding isn’t going to cut it!
If you’re worried about what’s involved in terms of hair and makeup and what you should wear and the cost of getting professional headshots done and all the rest of it, don’t worry; I’m going to give you some guidelines along with a few cost-effective tips.
Whether you decide to use a professional photographer or do-it-yourself, there’s something for you in this guide.
Using a professional photographer
If you have the budget, hiring a professional photographer is ideal. They are great at what they do and will guide you through the whole process - how to prepare, what to wear, how to pose - as well as provide you with a fully edited range of photographs you can use across all situations and platforms.
How do you choose a good photographer?
The best way is to ask for recommendations from other authors whose headshots you like. Don’t be shy! Writers are a friendly bunch and are usually very happy to pass on helpful contacts. You can often find the name of an author’s photographer somewhere in the footer of their website or in the caption of one of their headshots (check their About or Bio page.) If you’re traditionally published, your publisher may also have a preferred photographer (but don’t feel obliged to use them if you don’t particularly like their work!)
The big tip is to do your research. Check out their portfolio to see if their style of photography aligns with your own aesthetic. Make sure they have a process and pricing package that works for you, along with a swag of great reviews.
If you’re noodling around on the internet looking for a photographer, pay special attention to those that specialise in ‘personal brand’ photography rather than just straight ‘portrait’ photography, as they may have more experience with what’s required for websites, media, socials, etc.
What should I ask the photographer before booking?
Most professional photographers will ask you to fill in a briefing form or jump on a discovery call. Even if they don’t, either send them an email or ask for a call so you can ask these questions and discuss your needs.
Some questions you might like to ask are:
how many photographs will you receive (this is probably already listed in their packages if they have them)
how many locations and outfits does the package include?
will they curate the best images or send you the whole lot? The best scenario is if they omit all the ones with closed eyes, poor lighting, etc, and send you a good variety of images using each outfit and location so you can choose your favourites. You want to avoid having to wade through hundreds of images yourself but equally, you don’t necessarily want the photographer to make the final decisions for you, as they may be coming at the decision from, say, an artistic perspective rather than thinking about the end-use.
will they provide the chosen photos in black and white as well as colour?
what format and resolution will the images be provided in? Ideally, you’d like them in jpeg or png format and both high resolution (at least 2MB) and a web-friendly resolution (300-400KB)
do they provide any touch-ups (eg. removing blemishes or dark under-eye circles) or is that extra?
Tip: If budget is an issue and the photographer is a friend, they might be open to the idea of a contra deal. What skill do you have that they might need? If you’re a freelance writer, perhaps they need some copywriting done for their website or brochure. Just something to keep in mind.
Recommendations
Two photographers who specialise in personal branding and come highly recommended are:
Simply Loved Photography (Sydney) - Emma did the headshots for authors Pamela Cook, Rae Cairns & Dinuka McKenzie among others.
Gemma Carr (Melbourne) - Gemma photographed authors Kate Mildenhall and Katherine Collette who also interviewed Gemma about author headshots on The First Time podcast - well worth a listen!
Doing it yourself
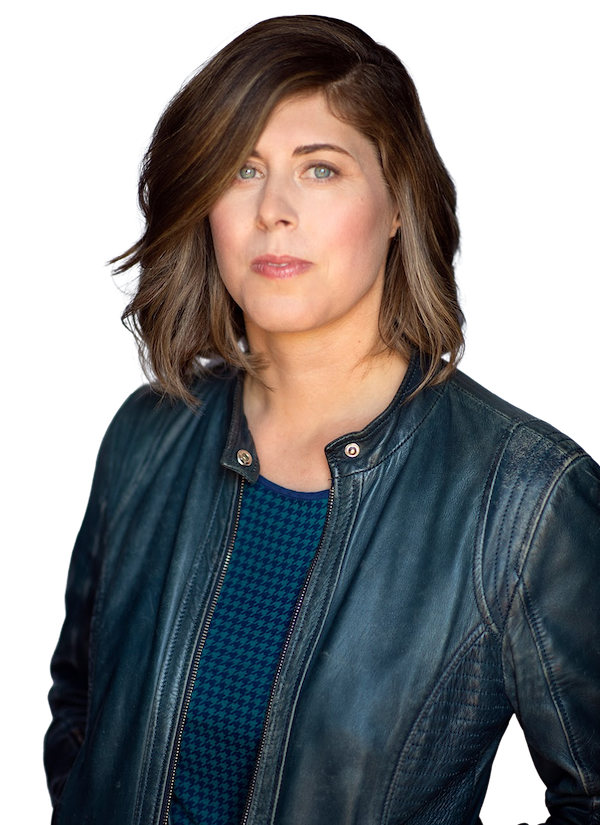
If you don’t have the budget for a professional photographer, fear not! There has never been a better time, technologically speaking, to be your own photographer. Smartphones have the ability to capture and edit high-quality images. In fact, the headshot of me at the top of this page was taken with a smartphone by a friend who was helping me out with some photography, and edited by me!
Equipment you’ll need
Digital camera or smartphone.
Tripod (K-Mart has an inexpensive range)
OPTIONAL: Ring light with warm and cool settings (K-Mart again, and often they have an inbuilt tripod)
Tips for a great DIY headshot
If you’re indoors, make sure there’s plenty of natural light, or use a ring light. It can be really lovely to shoot pictures outside during the ‘golden hour’ This is the period just after sunrise or before sunset and it gives a beautiful warm light and soft look to the pictures. What you don’t want is a harsh light so try to avoid the middle of the day or, if you’re indoors, avoid strong overhead lights.
Ensure you’re using the highest resolution settings on your camera or phone. If you’re using a smartphone, use the rear-facing camera, not the ‘selfie’ (front-facing) camera. Much better resolution!
In terms of editing, these days we’re lucky to have access to brilliant editing apps on our phones, including the photo app that came with your phone. There are also a vast array of photo editing apps you can download. It’s a good idea to upload the images onto your laptop or desktop computer so you can view and edit the image more clearly. My preferred apps are PicMonkey and Canva which have all sorts of cool retouching tools. Not only is there no need to fork out for expensive software, but all of these tools are fairly intuitive to use and come with step-by-step tutorials.
Follow the tips below on clothes, hair, makeup, location and poses.
Get some honest feedback from author mates or people who have a good design eye. You might think you’ve done a pretty good job but hey, you’re a writer so you know this - we don’t always see our own creative endeavours objectively! If in doubt, go with a professional photographer.
Gather your inspo!
No matter whether you’re using a professional photographer or DIYing, the first step is to gather your inspiration and prepare a ‘brief.’
What style of author portrait do you want? What are you trying to get across? Are you fun, funny, approachable, serious? What genre do you write in?
The best way to do this is to have a good ol’ poke around on the internet. Pinterest is a brilliant source of inspo. Use search terms like ‘author headshots’ and ‘personal brand images.’ Interchange the terms ‘images’ and ‘headshots’ for ‘photos’ and ‘photography.’ Add a genre or adjective to the search term eg. ‘crime author headshots’ or ‘whimsical personal brand photos.’
Start your own Pinterest board or Word document and fill it with headshots you like and what you like about them (eg. the pose? light? clothing choice?) Look for photos with different poses, clothes, props and locations.
Here’s the inspo shot I found online for my own photo:

Clothes, hair & makeup
When it comes to clothes, hair and makeup, the mantra is ‘you do you.’ Ask yourself which clothes make you feel most comfortable and most like your authentic self (Anna Downes talked a lot about this with her various photo shoot experiences on The First Time podcast.) But it’s also important to take into account the genre or style you write in. A romance writer, for example, probably wouldn’t wear a severe black pantsuit in her headshots.
Plain or neutral colours, or fine patterns work best - stay away from busy patterns as they can be really distracting. Same with jewellery - keep it to a minimum. Of course, if you’re known for being flamboyant, then by all means stick to clothing that best reflects your personality. That might just be a pair of statement earrings. Or if you’re a children’s author, you might want to go with something bright and fun. But when it comes to headshots, less is really more.
Most photographers will ask you to bring at least 3 outfits along to the shoot. If you’re DIYing, capture at least 3 different looks.
When it comes to hair and makeup, again, keep it simple and do whatever makes you feel most ‘you.’ A photoshoot isn’t the best time to try a radical new hairdo! Stick with the style that people will most recognise. You can definitely go a little heavier on the makeup, but again, keep it simple and understated if that’s what best suits your style.
When it comes to deciding what kind of ‘looks’ to go for, think about:
What is the end use for these photos? Are they for your website? Social media? Festival programs? The back or inside cover of your book?
What genre do you write in? If you write crime or dystopian fiction, you might go with darker colours. Romance writers might wear something more vibrant or less structured.
Do you have another ‘hat’ you wear as part of your author brand? For example, you might have a podcast or offer editing services or act as a festival facilitator, any of which may require a different look or vibe. The author Pamela Cook has a variety of headshot styles on her website, depending on whether the image is going with her podcast page (she records in a vintage caravan called Virginia so she’s gone with a vintage floral frock for those photos) or her rural fiction or in her capacity as a writing teacher and mentor. You can see the variety of her headshots on her About page.
Strike a pose
Let’s talk poses. While professional photographers know what poses work best for headshots in general, they may not be across every situation your headshot could be used in.
For example, I always ask my website clients to ensure the photographer gets a few wide landscape images with the author to one side because these work brilliantly as banner images on websites.
Here are a few author client examples:


If you do decide to get this type of shot for your website, ask the photographer to ensure the background is fairly plain so that if you want to put text over the top, it’s not competing with a busy background.
In terms of the tone of the pose, it can be helpful to look at the headshots of other authors in your genre for inspiration. Look at these examples:

Rachael Johns
Feel-good fiction, romance

Remy Lai
Children’s author - friendly, fun, also an illustrator
Ashley Kalagian-Blunt
Thriller, crime, edgy

Craig Silvey
Serious, literary
If you’re taking your own photos or roping in a friend with a good eye, make sure you get a range of photos at different angles, for example, with your head turned slightly one way, then the other, then straight ahead or looking up a little. And whatever you do, make sure that camera is at eye level or slightly above. No double chins!


Finally, make sure you get the following shots, like Rae Cairns has done below:
head and shoulders
3/4 shot
full length

I hope this guide has been helpful. If you’d like to share it with your author mates, encourage them to sign up and I’ll send them the link to this page.
For more fab website tips and to stay in the loop with my upcoming Build Your Author Website course, sign up to my newsletter here.
I can’t wait to see your new author headshots!